The GDB Python API, ARM, RISC-V, Low Level Debugging
The Gdb Python Api For Tui Windows: Part 4
13 Mar 2022 – StevenLwczIntroduction
A command you might use a lot is (gdb) info locals and in this article we will implement a Tui Window which does something similar but also updates automatically after each step. We will look at the vscroll() method in the Tui Window protocol to make our window scrollable.
(gdb) info locals prints the variables from the current code block and the parent block up to but not including the static block. We will see how to achieve the same behaviour.
Python APIs for Variables
The Python APIs We will be looking at are from these three categories.
Each frame has a block and the Block object will contain all the symbols for that current code block. We can quickly look at what is in a block by using the Python command line within GDB. We will use circle1.c from the previous blog.
circle1-gdb.gdb
b 40
b 73
r
$ gcc -g -o circle1 circle1 c
$ gdb -q ./cricle1
(gdb) python
>frame = gdb.selected_frame()
>block = frame.block()
>for symbol in block:
>    print(symbol.name)
>end

buff
p1
Sector
s1
s2
area
length
Symbols include not only variables but other types.
To read the values of each symbol we will use read_var() method which also takes Symbol objects. To develop further we will put our Python script in a file and use (gdb) source to run it.
circle1.py
frame = gdb.selected_frame()
block = frame.block()
for symbol in block:
    print(symbol.name)
    var = frame.read_var(symbol)
    print(var)
(gdb) so circle1.py
buff
"Hello Circle Program\000"
p1
0x7ffffff190 "Hello Circle Program"
Sector
Traceback (most recent call last):
  File "circle1.py", line 5, in <module>
    var = frame.read_var(symbol)
gdb.error: Cannot look up value of a typedef `Sector'
We have a problem. The read_var() throws an exception with type names. We can avoid this by checking the symbol property is_variable.
circle1.py
frame = gdb.selected_frame()
block = frame.block()
for symbol in block:
    if symbol.is_variable:
        var = frame.read_var(symbol)
        print(symbol.name, var)
(gdb) so circle1.py
buff "Hello Circle Program\000"
p1 0x7ffffff190 "Hello Circle Program"
s1 {angle = 180, radius = 10}
s2 {angle = -3696, radius = 127}
area 1.77964905e-43
length -9.39612088e+33
A Symbol object has lots of other properties we could use.
circle1.py
frame = gdb.selected_frame()
block = frame.block()
for symbol in block:
    if symbol.is_variable:
        var = frame.read_var(symbol)
        print(symbol.line, str(symbol.type), symbol.name, var)
(gdb) so circle1.py
34 char [22] buff "Hello Circle Program\000"
35 char * p1 0x7ffffff190 "Hello Circle Program"
39 Sector s1 {angle = 180, radius = 10}
40 Sector s2 {angle = -3696, radius = 127}
42 float area 1.77964905e-43
43 float length -9.39612088e+33
If we step into a function and run our python script then function arguments are not shown. We can include them by checking the is_argument property.
if symbol.is_variable or symbol.is_argument:
The Block object only has the variables of the current frame. But it does have a property superblock to access the parent block and hence follow the chain back to the top.
circle1.py
frame = gdb.selected_frame()
block = frame.block()
while block:
    for symbol in block:
        if symbol.is_variable or symbol.is_argument:
            var = frame.read_var(symbol)
            print(symbol.line, str(symbol.type), symbol.name, var)

    block = block.superblock
Let’s try it out in a piece of code which has nested blocks.
(gdb) c
Continuing.

Breakpoint 2, main () at circle1.c:73
73                  length = len1 + 1;
…
(gdb) so circle1.py
71 int len1 32
67 int len 32
34 char [22] buff "Hello Circle Program\000"
35 char * p1 0x7ffffff190 "Hello Circle Program"
39 Sector s1 {angle = 360, radius = 10}
40 Sector s2 {angle = 45, radius = 10}
42 float area 78.5398178
43 float length 64
30 struct Sector circle2 {angle = 360, radius = 5}
29 struct Sector circle1 {angle = 360, radius = 10}
Since we want to exclude the static and global blocks we can test if the block has reached the static with:
    if block.is_static:
        break
Creating the Auto Window
Now we are ready to move onto our auto window. In order to implement scrolling we will build up our list of variables and values in a Python list in a method called create_auto() then have the render() method write this list to the Tui window. The program builds on elements discussed in Part 3..
auto-win.py
GREEN = "\x1b[38;5;47m"
BLUE  = "\x1b[38;5;14m"
WHITE = "\x1b[38;5;15m"
YELLOW = "\x1b[38;5;226m"
RESET = "\x1b[0m"
NL = "\n\n"

class AutoWindow(object):

    def __init__(self, tui):
        self.tui = tui
        self.list = []
        self.title = ""
        self.start = 0
        self.prev = {}

    def close(self):
        pass

    def vscroll(self, num):
        pass

    def render(self):
        pass

    def create_auto(self):
        self.list = []

        try:
            frame = gdb.selected_frame()
        except gdb.error:
            self.title = "No Frame"
            self.list.append("No frame currently selected" + NL)
            self.render()
            return

        self.title = frame.name()

        block = frame.block()

        while block:
            for symbol in block:
                if not symbol.is_variable and not symbol.is_argument:
                    continue

                name = symbol.name
                line = symbol.line
                type = str(symbol.type)
                arg = "*" if symbol.is_argument else " "
                val = frame.read_var(symbol, block)

                hint = BLUE if name in self.prev and self.prev[name] != val else WHITE
                self.prev[name] = val

                self.list.append(f'{arg}{line:<6}{YELLOW}{type:<16}{GREEN}{name:<10}{hint}{val}{RESET}{NL}')

            block = block.superblock
            if block.is_static:
                break

        self.render()
We have added some colour as before and indicated any arguments with an asterisk. This can be tested with a bit of Python from the GDB command prompt.
(gdb) so auto-win.py
(gdb) python
>auto = AutoWindow(None)
>auto.create_auto()
>for l in auto.list:
>    print(l)
>end

 34    char [22]       buff      "Hello Circle Program\000"
 35    char *          p1        0x7ffffff190 "Hello Circle Program"
 39    Sector          s1        {angle = 180, radius = 10}
 40    Sector          s2        {angle = -3696, radius = 127}
 42    float           area      1.77964905e-43
 43    float           length    -9.39612088e+33
The render() method is simplifed to just write the list to the Tui window. self.start indicates which line to start from and will be updated by the vscroll() method later. Since GDB calls render() on a resize of the window, this is a good approach.
   def render(self):
        if not self.tui.is_valid():
            return

        self.tui.title = self.title
        self.tui.erase()

        for l in self.list[self.start:]:
            self.tui.write(l)
Our factory method will register the create_auto() method with the before_prompt event. And close() will remove it from any event processing.
def AutoWinFactory(tui):
    win = AutoWindow(tui)
    # register create_auto() to be called each time the GDB prompt will be displayed
    gdb.events.before_prompt.connect(win.create_auto)
    return win

    def close(self):
        # stop create_auto() being called when the window has been closed
        gdb.events.before_prompt.disconnect(self.create_auto)

# Register the AutoWindow class with gdb.
gdb.register_window_type("auto", AutoWinFactory)
Update circle1-gdb.gdb to create a new layout and turn on Tui mode.
circle1-gdb.gdb
b 40
b 73
r
so auto-win.py
tui new-layout debug1 auto 1 src 2 status 0 cmd 1
layout debug1
$ gdb -q ./circle1
Adding Scrolling
In order to make our auto window scroll, we will first examine the behaviour of the vscroll() method.
    def vscroll(self, num):
        print(num)
GDB will call this method when the window has focus and we use the up and down cursor keys. This method is also called on page-up and page-down and the window height is passed.
(gdb) focus auto
(gdb) -1
(gdb) 1
(gdb) -10
(gdb) +10
All we need vscroll() to do is update self.start and stay within the bounds of the list. GDB does not call render() after vscroll() so we need to do this ourselves.
    def vscroll(self, num):
        if num > 0 and num + self.start < len(self.list) -1 or \
           num < 0 and num + self.start > 0:
            self.start += num
            self.render()
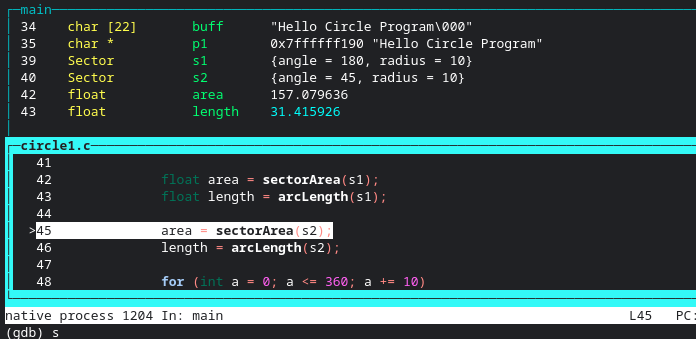
You can get information about all the Tui Windows with (gdb) info win. Let’s make our auto window a little smaller. You may need to adjust depending on the size of your screen, get focus of the window and we can use the up and down cursor keys to scroll.
(gdb) wh auto -4
(gdb) focus auto
The next issue to address, is when a new block has been entered and self.start is greater than the number of variables, the auto window will be empty.
To solve this we can reset self.start when the block changes.
    def __init__(self, tui):
        …
        self.block = None

    def create_auto(self):
        …
        block = frame.block()
        if not block == self.block:
            self.start = 0
            self.block = block
        …
The final version of auto-win.py can be found in my git repository.
Final Thoughts
Having an auto window could help reduce the amount of items in the command window and improve the experiance over GDB’s normal ways of displaying variables automatically.
If we wanted to configure the auto window, say control how many parent blocks are displayed, we can add a new custom GDB command to pass the information to create_auto(). We might want to only display variables and values like (gdb) info locals or add a hex mode. I might add a few of these features in a future blog. Check out the dev branch for my work in progress in this area.
Lastly you can have multiple Tui Windows and layouts and use (gdb) layout [layout] to switch between them as needed.
circle1-gdb.gdb
b main
r
so ../gdb-python-blog/auto-win.py
so ../gdb-python-blog/watchwin-basic.py
tui new-layout debug1 auto 1 src 1 status 0 cmd 1
tui new-layout debug2 watch 1 src 1 status 0 cmd 1
tui new-layout debug3 watch 1 auto 1 src 1 status 0 cmd 1
This series of blogs gives a framework for creating Tui Windows in GDB. You can write anything to a Tui Window which makes it quite a powerful feature. If you have Python scripts for frame filters, etc you could now consider using a Tui Window as well.
I’ve been using it to create custom register windows for assembler programming which will be the subject of the next few blogs.